
Stained Glass Soldering Techniques
Stained Glass Soldering is probably the most complicated aspect of stained glass, and for the beginner will take the longest to master. However, do not be discouraged. With a little practice and patience, you can be an expert in no time.
A soldering iron is simply an electric tool that gets very hot at the tip and melts the solder. Solder is what holds the glass pieces together when doing the foil technique.
Soldering irons come in various types and power ratings. Some have adjustible power settings but these are generally more expensive than the fixed temperature types.
For a beginner, a fixed temperature soldering iron around 80-100 watts will do most projects. A soldering iron station makes a good investment as it already has a stand for the hot iron and many times a sponge for cleaning the tip.
For the beginner, I would recommend starting with a simple soldering iron that is relatively inexpensive. There are a lot of different types of irons available, many with a lot of features that you are not going to need. Below are two highly recommended soldering irons:
Weller WLC200 Stained Glass Soldering Station – 80 Watts

Weller 1175 Stained Glass Iron

Solder is what holds all the pieces of glass together. Tin/lead solders are used because they have a low melting point. The lead content is expressed as either a percentage (40%) or a fraction (60/40). The tin content is first and the lead content second. There are also lead free solders that have nearly identical working properties.
Soldering Flux is very important when soldering. It cleans the glass surface and the copper foil and also keeps the solder from sticking to the glass. If you do not use flux when soldering, the results will be disappointing. Luckily, flux is inexpensive so make sure you get enough. Be sure to get some small brushes to apply the flux. Below is a good stained glass flux:
Novacan Old Masters Stained Glass Flux

Stained Glass Soldering Techniques
The first step is to assemble all the pieces in your pattern. Ensure that each piece is placed exactly where you want it. Start by applying flux to all the exposed foil.
Using your hot iron, tack all the pieces together by placing a small amount of solder across the joint. Be careful, the flux can flash boil from the heat of the iron and spray hot solder everywhere.
Wear safety glasses when soldering. Check to make sure none of the pieces have moved. If one got out of place, simply reheat the solder, move the glass, and re-tack.
Now that all the pieces are lightly tacked together, it is time to solder all the joints. Apply more flux to the joints. Starting at the edge of the glass, hold the soldering iron so the flat part of the tip is perpendicular to the glass.
Touch the solder to the tip and drag or push the iron across the joint feeding more solder as you go. The trick is not to go too fast, too slow, feed too much solder, or not feed enough solder.
If you go too fast, the solder line will look flat. If you go too slow, the solder line will be very thick and will possibly run off on to the surface of the glass.
Feeding the solder at an appropriate rate is also important. Too fast and the solder line will get too thick and too slow, the solder line will be flat. It will take some practice to get the feel of iron speed and solder feed rates.
Remember, do not get discouraged if your first few tries are not perfect.
If you need to go back over a joint, make sure that you melt the solder before and after the area that needs retouched to blend all the solder together.
When coming to an intersection with multiple joints, apply solder a little way into each joint before continuing. This will make the intersection look even and smooth.
When you have come to the end and you need to pick up the iron, do not pull the tip straight up. This will leave an undesirable feature, usually a ball of solder.
Instead, simply pull the iron tip off to the side keeping it in contact with the glass. The flux will keep the solder from sticking to the glass and this procedure will leave a smooth nice looking solder line.
Step-By-Step Photo Tutorial Guide:
Tools Used:
 100W Soldering Iron |
||
 Flux Brush |
||
 Flux |
 60/40 Solder |
 Damp Sponge |
Process Followed:

Lay out the pattern and make sure all the pieces fit as you want them to.

Apply flux to all the joints.

Hold the soldering iron with the flat edge perpendicular to the surface of the glass.


Tack each piece of glass to each neighboring piece by applying a little solder to the joint. Make sure you use enough flux or the solder will stick to the glass similar to the bottom of the two pictures. If this happens, simply apply flux and touch with the soldering iron.

Be sure to wipe the tip of the soldering iron frequently to keep it clean.

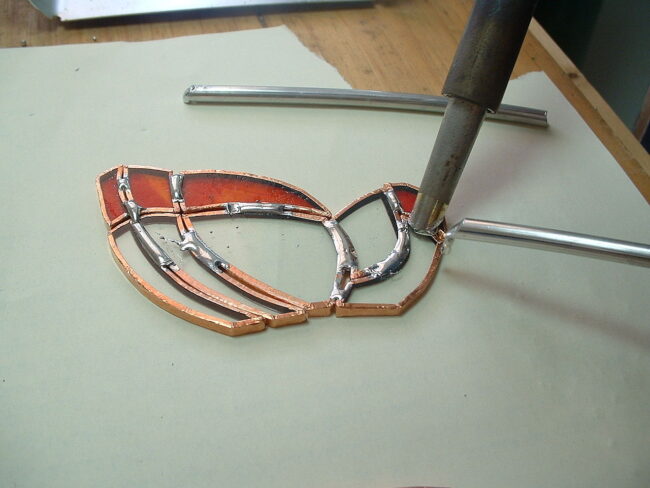
When approaching an intersection where multiple joints meet, apply solder a little ways into each joint to make sure the solder lines are even and smooth.

This is what the project looks like after all the joints have been soldered. Notice that there is some solder that splattered from the flux boiling. The little pieces of solder can be removed easily due to the flux.

Turn the work piece over and repeat the process on the back side. Be sure not to keep the solder in one spot for too long as it will melt the solder on the front side and you will have to repair it later.
Laying a damp towel under the work piece helps keep the solder on the front side cool when working on the back.

The finished work piece. All that is left to do is frame and display it in a well lit area.
Want to see a video tutorial? Check out this Youtube video for a live Stained Glass Soldering Process: