
Stained Glass Foiling Techniques
Stained Glass Foiling is a simple process but an important one none-the-less.
Foil is what the solder adheres to keeping the glass together.
Foil is sticky on one side and shiny on the other. The most common foil is made out of copper, but there are several types available.
For starting out in stained glass, I recommend using a copper foil. Foils also come in a few colors. Generally, you will see copper foil with silver backing, black backing, copper backing, etc.

The different color backings are for working with different kinds of glass and patinas.
For example, if you were using clear glass and intended to leave the silver colored solder as is, you would choose a copper foil with silver backing.
This will make the artwork look more professional. On the other hand, if you were using opaque glass, you would use copper foil with copper backing which is often cheaper than the other types.
Since you will not be able to see the foil through the glass, you do not need any special color for the backing. If you plan on using a patina, which tarnishes the solder to a black color, you would use copper foil with black backing.
Foil also comes in a variety of widths. Choosing which width will work best for your artwork will depend on the thickness of the glass and how much solder you want to show on the surface.
The wider the foil, the wider the solder line will be. If you are working with small pieces, a foil that is not very wide will keep from covering up so much of the glass.
You can use different widths on the same project. It really comes down to how you want the finished piece to look. The more you do, the easier it will be to decide how wide the foil should be.
There is one basic tool that will make Stained Glass Foiling easier, a foil burnisher. This is simply a plastic stick that is used to press the copper onto the glass and remove any wrinkles in the foil.
Now that you know what tools and supplies are needed for Stained Glass Foiling, let us move on to :
Stained glass foiling techniques
CAUTION: protective gloves should be worn as the glass is very sharp. With your pattern cut out and all your pieces numbered, you are ready to start foiling.
Start by peeling away a little of the paper backing from the foil, 1 to 2 inches should be fine.
If you remove too much at one time, it can be quite frustrating to end up with a ball of copper all stuck to itself.
With the sticky side of the foil toward the glass, adhere the end of the foil to the edge of the glass making sure it is centered.
Work your way around the edge of the glass, keeping the foil centered and removing more of the paper backing as needed.
When you get back around to where you started, over lap about 1/4 inch and cut the foil. A pair of household scissors works well for this.
Next, run your burnisher along the edge of the glass to adhere the foil to the glass edge. Roll the foil over onto the top and bottom of the glass and smooth it out as best as possible.
It is nearly impossible to get the foil perfectly flat at sharp corners. The foil should wrap all the way around the edge of the glass and cover all the sharp edges if done correctly. Repeat for every piece of glass in your pattern.
The key to successful Stained Glass Foiling is getting it centered and adhered securely to the glass. Practice makes perfect. The more you do it the better and faster you will get.
Try experimenting a little to get a feel for the best way to hold the glass and the foil that feels the best for you.
After all your pieces are foiled, reassemble them onto your pattern using your numbers as a reference for position and orientation.
Keep in mind that the foil adds some additional material to the edges of the glass and will make your assembly slightly bigger than the pre-foil assembly.
If you made sure all the glass pieces fit together well before foiling, you should not have any problems with fit after Stained Glass Foiling.
If there are a couple pieces that simply do not fit like they should, remove the foil and use your grozer pliers to nibble away glass until they do fit.
Foil the pieces again and move on to the next lesson, Soldering Techniques.
Step-By-Step Photo Tutorial Guide:
Tools Used:
 Foil Burnishers |
 Copper Foil |
 Scissors |
Process Followed:
 Peel back the paper from the foil a couple inches. Exposing too much of the sticky part of the foil can become problematic when it starts sticking to everything including itself. |
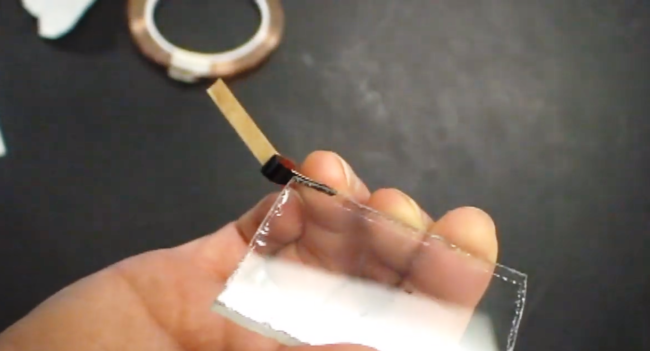
 Making sure the foil is centered along the edge of the glass, go all the way around the piece peeling back more of the paper as needed. |
 After getting back to where you started, over lap the foil 1/4 to 1/2 inch. |
 Use a foil burnisher to press the foil securely onto the edge of the glass. |
 Roll the foil on to the front and back surfaces of the glass using the foil burnisher. Press the foil firmly on to the faces of the glass to make sure it is securely attached and free from any wrinkles. |
 This is what a finished piece should look like after being foiled. |
 The pattern after all the glass pieces have been foiled. |
Need a video tutorial? Check out this Youtube video for a live Stained Glass Foiling Process:
The next lesson is on Stained Glass Soldering Techniques.