
DIY Stained Glass Cutting Techniques
Now that you have your pattern chosen, you are ready to start selecting your stained glass and cutting it to size.
Glass comes in a variety of colors and thicknesses. For starting out, I would recommend selecting glass that you can see through. This makes transferring the pattern to the glass with a washable marker much easier.
If opaque glass is chosen, a light box can be used to illuminate the pattern from the back so it will show up on the glass.
Stained Glass Cutting can sometimes be a little frustrating, but with a little guidance and some practice, it can easily be mastered.
You will need a few tools to get started, but they are relatively inexpensive. The most important tool is going to be a cutter.
A glass cutter is a little misleading since it does not actually cut the glass; rather it scores the glass creating a line that the glass will break along.
Glass cutters typically use a diamond or carbide roller that runs across the glass creating the score line. There are several styles of cutters available.
For beginners, I recommend a pistol grip style cutter since they are generally easier to hang on to, easier to control, and can usually be filled with Stained Glass Cutting oil.
As your skill progresses, you might find that a more typical glass cutter is more suited to you.
Cutting oil, while not absolutely required, is strongly recommended. It will prolong the tip on your cutter and give you more consistent score lines for longer service life of the cutter.
There is not really much to choosing a cutting oil, but generally you get what you pay for. For the most part, the more expensive the oil, the higher quality it is.
However, there are exceptions, so do not go overboard. Below is a good Stained Glass Cutting oil to start with:
Fletcher Terry 09-541 Fluid Glass Cutter
Stained Glass Cutting Techniques
When scoring glass with the cutter, it is important to follow a few simple rules:
Always wear safety glasses: There is no more important rule than to wear appropriate eye protection.
Apply even, consistent pressure: Even and consistent pressure on the cutter will give you a nice score line. When correctly running the cutter across the glass, it should sound almost like a faint crackling.
The score line will look like a hair laying across the surface of the glass. If you cannot hear anything and are not leaving a line in the glass, you are probably not applying enough pressure to the cutter.
Do not apply too much pressure on the glass with the cutter: Pushing too hard on the cutter will chip out tiny pieces of glass along the score line and will make the glass break unpredictably.
This will also lead to edges that are rough and can make applying the copper foil more difficult. It will also wear your Stained Glass Cutting tip more quickly. With a little practice, you will be able to tell when you are pushing too hard on the cutter.
Run the score line from one edge to the other: Always start as close to the edge of the glass as possible and run your score line all the way to the other edge.
Never stop in the middle of the glass and pick up the cutter as the glass will break unpredictably where you stopped.
If possible, place something on the work surface to protect it when you run the cutter off the edge of the glass. It is important to make sure that the cutter runs off the edge when finishing the score line because that will be where you will start when breaking the glass.
Do not stop, turn the cutter, then start again: Stopping the cutter in the middle of the glass, turning it, then finishing to the other end will likely end with a bad break.
Glass does not like breaking along sharp corners and the crack will more than likely shoot off in a random direction, potentially ruining your work piece.
Do not go back over the same score line: If, for some reason, the score line is too light or does not go all the way across the glass (i.e. from inconsistent cutter pressure), do not go back over the same score line.
This will create, multiple scores and the glass will not break as you had planned. It is also hard on the cutting tip since after the first pass, very small pieces of glass get inside the score line and will dull the cutter tip.
If you need to start over, create a new score line about 1/4 inch from the first, break the glass, and try again.
Following these simple rules, you will find breaking the glass much easier. Large pieces of glass can be broken along the score line by hand.
I turn the glass over so the score line is on bottom and break it away from me so little bits of glass do not fly at my face. Always wear safety glasses when breaking glass.
Believe me when I say that fishing a piece of glass out of your eye is not a pleasant experience. For smaller pieces of glass, there are special tools that make the process easier and safer.
Glass is very sharp and you can get cut easily trying to break small pieces by hand. When starting out, I recommend two types of glass breaking pliers.
While there are a large number of specialty pliers available, the glass breaking pliers, also known as glass running pliers, and combination breaker/grozer pliers are really all you will need for a while.
The running pliers have a special curved jaw design that will break the glass along the score line. Simply line up the arrow on the pliers with the score line and squeeze.
A good pair of running pliers will have a screw that can be adjusted to keep the jaws from going completely closed.
The combination breaker/grozer pliers allow for small pieces of glass to be nibbled away if the original work piece is slightly too large or out of shape.
Once you have all your glass cut out, dry fit them over the original pattern to make sure they fit together correctly.
If some of the pieces need a little tweaking, use the grozer pliers to remove small amounts of glass until each piece fits like you want them. I also like to number each piece with washable marker.
This helps me know what face of the glass goes up and the correct orientation to make it easier to reassemble after foiling. Move on to the next lesson for Foiling Techniques.
Step-By-Step Project Guide:
Tools Used:
 Pistol Grip Glass Cutter |
 Running Pliers |
 Stained Glass Cutting Oil |
 Grozer Pliers |
Process Followed:
 |
| Here is the piece of glass which has already been cut to fit two sides of the triangular shape. It has been lined up with the pattern and is ready to be scored. |
 |
| I like using a straight edge whenever possible to make my cuts. This makes it easier to fit all the pieces together in the end. Using the techniques described above, I score the glass with the glass cutter. |
 |
| While it may be difficult to see, there is a hair thin score line running across the face of the glass. This is where the glass will break. |
 |
| Starting on the edge of the glass where I ran the cutter off, align the mark on the running plier jaws with the score line and squeeze. |
 |
| The glass should break along the score line. |
 |
| The final shape of the pattern piece. |
 |
| If the piece of glass is slightly too large or out of shape, use the grozer pliers to nibble away the glass until it fits correctly. Be careful not to try and nible too much in one pass as this can cause the glass to break where you do not want it to. |
 |
| Even the most experienced cannot always predict where the glass is going to break. This particular piece had an air bubble that disrupted the crack causing the glass to break off the score line. It happens. Get a new piece of glass and start again. |
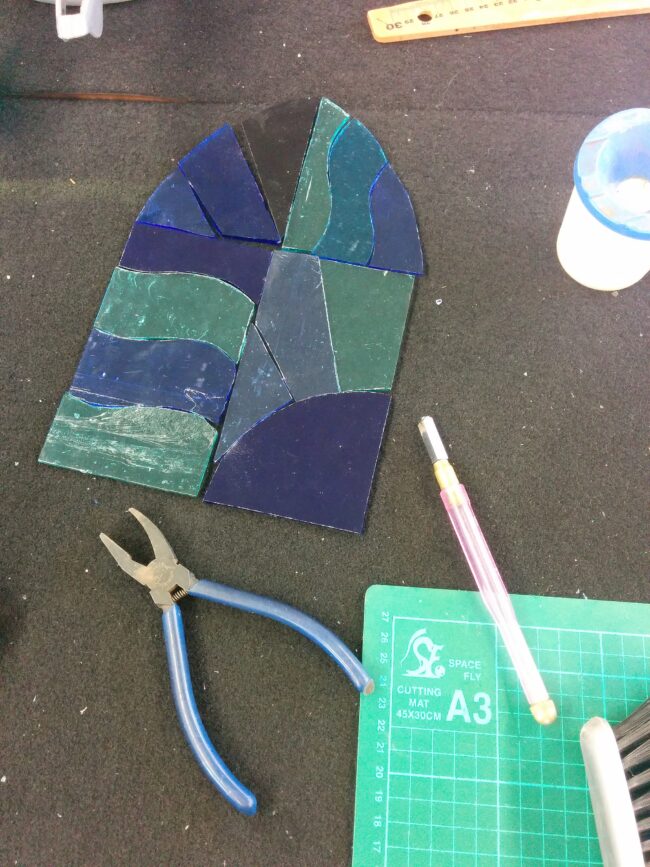
After all the pieces are cut out, the pattern looks like the following:

The next lesson is on stained glass Foiling Techniques.